Upload an Image to S3 Bucket With Swift
Tutorial: Using Amazon AWS S3 storage with your iOS Swift App
While the Amazon Mobile SDK documentation is very complete, information technology can be confusing for someone getting started. Like any backend service, AWS has a lot of moving parts, and you lot need to become them all working together before your app works.

This tutorial will get y'all started using Amazon AWS past building an iOS app using XCode vi and Apple Swift that reads data from the AWS S3 (Simple Storage Service). Of form your production app will need to do much more than this, and all of those other function points will build on the setup we'll practice in this tutorial. Prepare? Let's get started!
Overview of the process
To have your app up and running reading from S3, there are a few things you need to do. The first is to create an Amazon developer ID. I assume you've done this already, but if not, head over to the Amazon AWS developer dwelling page, and click the orange Try AWS for Gratis push at the top-right of the page. Then come back to this tutorial then nosotros can get started.
Here's a summary of what we'll do in this tutorial to go things working:
- Create an S3 Bucket
- Upload some images into the S3 Bucket
- Create a Cognito Identity pool for the app to utilise
- Use IAM to authorize the app to read from the S3 bucket
- Setup our XCode environment to utilize the Amazon Mobile SDK for iOS
- Code the app so it can access the AWS S3 bucket via the SDK
It sounds like a lot of steps (and it is!). But just follow along, and you'll have an app working confronting AWS in no time!
Amazon S3 works a lot like a cloud-based file system. The bones unit of storage y'all'll utilise is a "Bucket". A bucket is analogous to a hard disk drive book. Typically you create a bucket to store information for your application. You can also create folders inside buckets. You can't create buckets within buckets, though — merely as you tin can't create difficult disks inside hard disks.
User authorizations are created against the saucepan, and nosotros'll create a single authorisation policy for all users of the tutorial app. In this awarding nosotros'll create a bucket, and store some images in the bucket (without folders). Our app will be authorized to access the images via a Cognito identity pool.
Create an S3 Bucket
First caput over to the AWS Management Panel, and click on the S3 link nether Storage and Content Commitment.
In the popup window, provide a unique Bucket Name for the bucket, select your preferred AWS Region, and then click on the Create push.
The Bucket Proper name you select must be unique amongst all users (non just within your own account). You can prepend the bucket name with characters that are specific to your company to arrive less frustrating to create unique names.
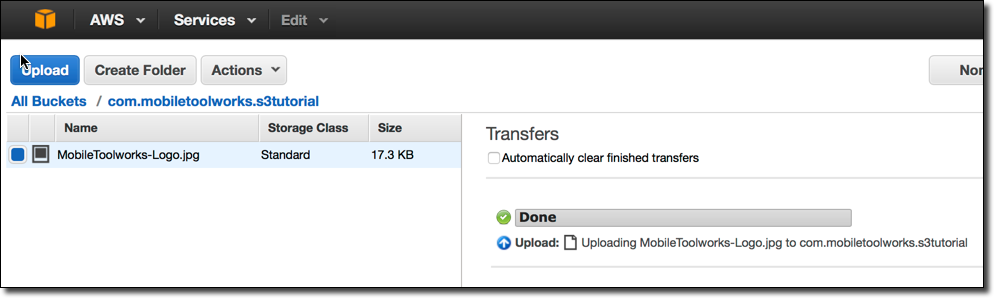
With the bucket created, let's upload a few images to utilize in our application. From the S3 panel, click on the name of the bucket yous just created, then click on the Upload button.

Next select a file from your computer to upload and save it. I've uploaded a single paradigm to the S3 bucket. Later on yous salve the file, it will be in the S3 bucket list, equally below.

At this point we have a saucepan with a file to display in our iOS app. Adjacent we need to create an authority using Cognito so the mobile app will be able to read the file from the saucepan.
Cognito is the AWS authorization facility used to provide remote application authentication for AWS resource. Once a user is authorized with Cognito, the Identity and Access Management service is used to map authorizations betwixt Cognito authorized users and AWS resources.
Cognito can back up both unauthenticated and authenticated users simultaneously. Information technology can consul authentication to various Identity systems, like Google, Twitter and your custom authentication provider to meet diverse requirements.
In this introductory tutorial, we'll use an unauthenticated identity — essentially letting anyone who uses our app to access the prototype we put in the S3 saucepan. This is mutual for B2C applications. Layering user authentication on top of this design tin can certainly be washed without changing the basic design of the app.
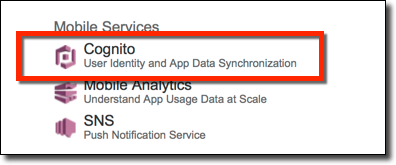
With that introduction, let'due south setup Cognito! First navigate back to the AWS Management Console, and and then click the link to Cognito underneath the Mobile Services heading.
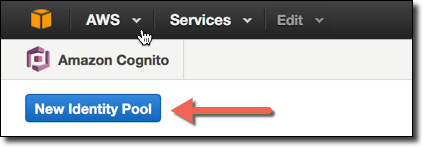
At the peak of the Amazon Cognito console, click the New Identity Puddle push button.
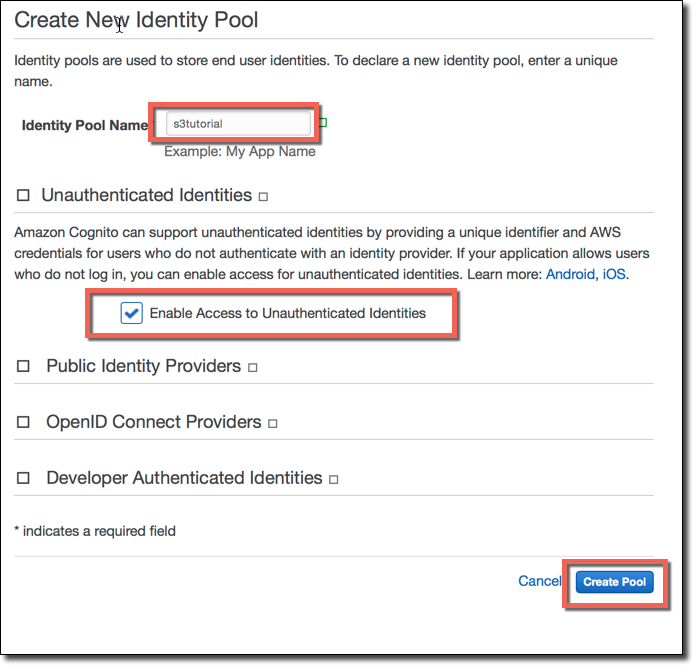
On the start footstep screen:
- Give the identity pool a proper noun (which must exist unique in your account)
- Click the checkbox to let unauthenticated identities. This will enable u.s.a. to authorize our app to read from the S3 bucket without authenticating users with an authentication provider
- Click the create pool button
If our awarding was to be restricted to authenticated users but, we would use the to define Public, OpenID and/or Programmer Authenticated Identities sections to integrate Cognito with the authentication provider we chose to utilise.
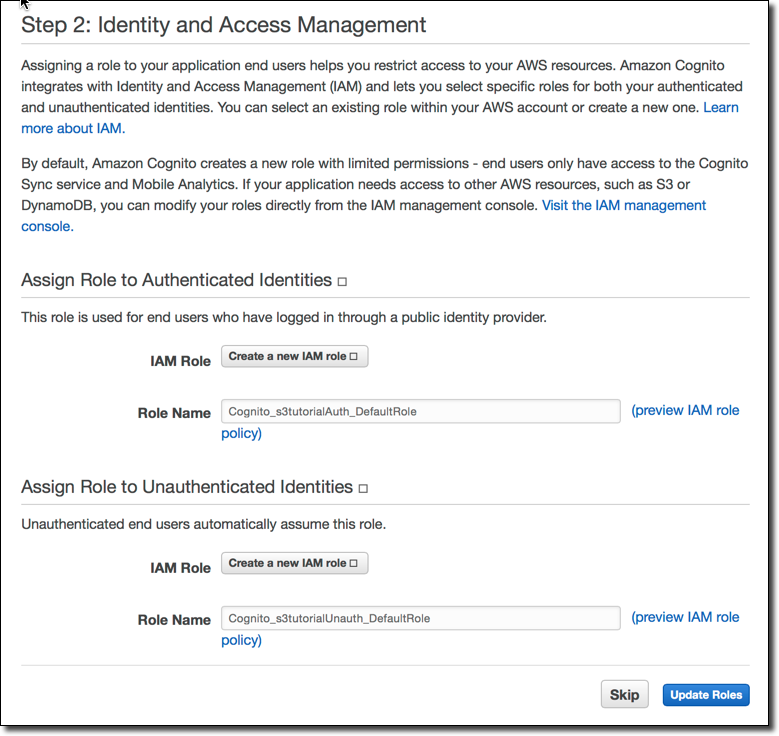
On the next screen (pace ii), by default y'all'll create two Identity and Access Management (IAM) roles — one for authenticated users, and the other for unauthenticated users. As you can probably guess, authenticated users can have different privileges to AWS resources than unauthenticated ones. In an application like ours, we might allow unauthenticated users to view images, but simply authenticated users to upload images.
The default settings on this screen are fine and the names are sensible for our purposes. Review the screen, and click the Update Roles button.
Next we need to qualify app users who use the Cognito office we created to have read access to the image we uploaded to the S3 bucket.
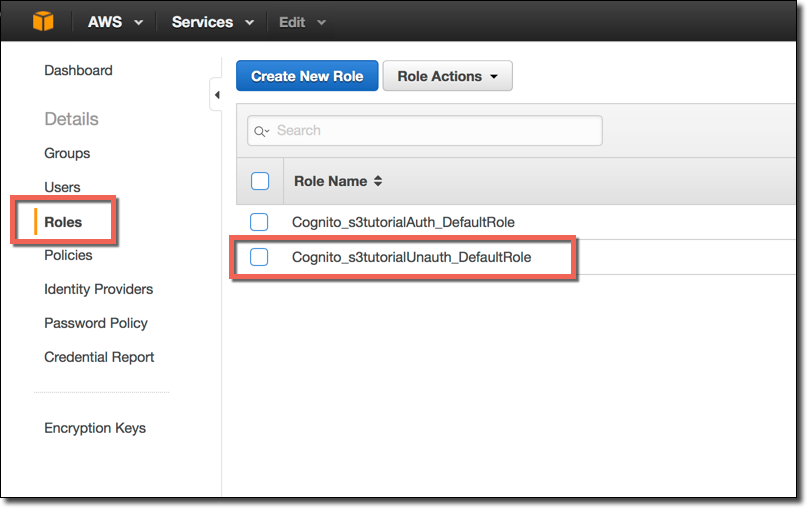
Caput over to the IAM Management Console, click on the Roles link in the left-hand navigation, then click on the unauthenticated part y'all created in the previous step (in this example it'due south chosen Cognito_s3tutorialUnauth_DefaultRole).
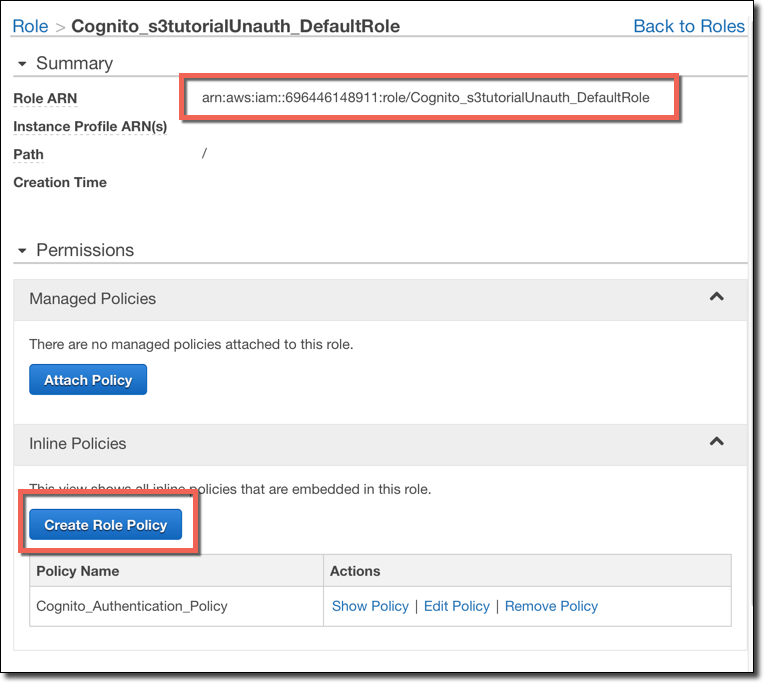
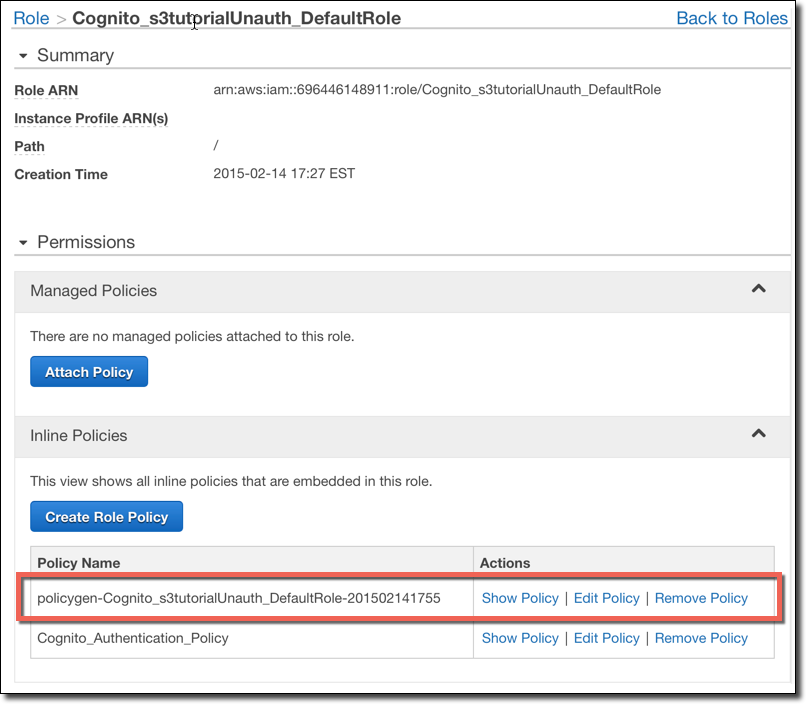
On the next screen, you lot can see the role and policies that were assigned when the role was created. Past default, there is a role policy that allows user contour information to exist saved.
Earlier going further, make a note of the Function ARN, and copy it to the clipboard, then salve it in a text editor. You'll need this later when configuring your iOS application in XCode.
In one case you copy the ARN, click the Create Role Policy button to create the role that will permit reading of the S3 bucket images.
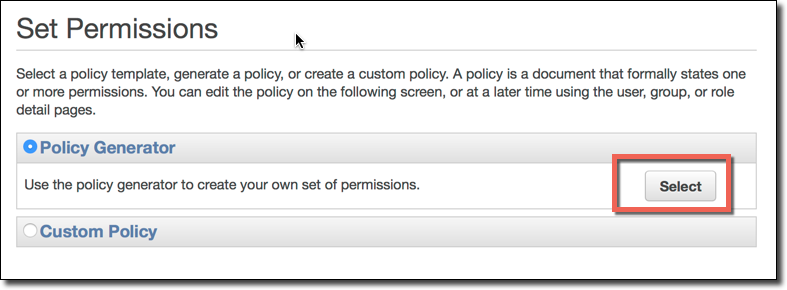
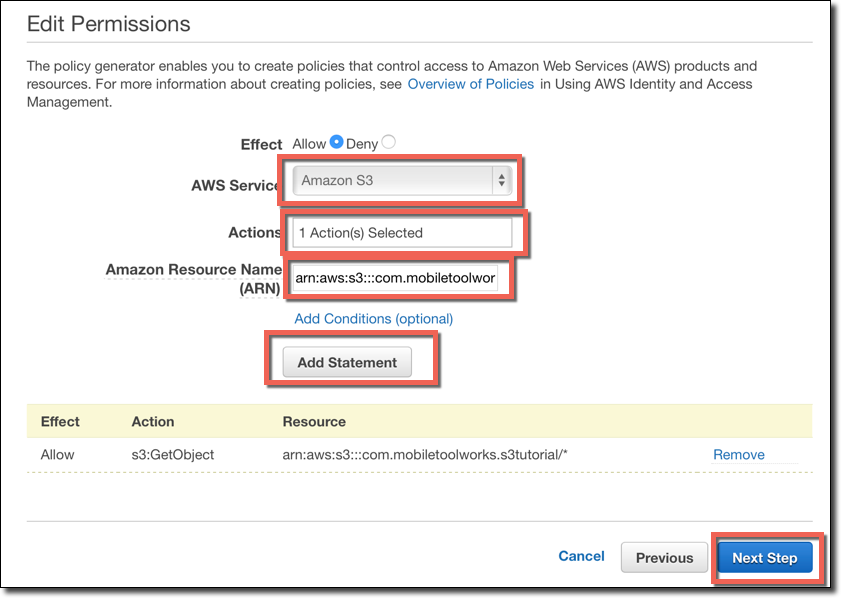
The Set Permissions form allows you lot to use a Policy Generator or a Custom Policy. Click the Select button to choose the erstwhile choice so we can use a configuration GUI to generate the policy instead of typing in the JSON syntax past hand.
In the Policy Generator make the following selections:
- Select Amazon S3 equally the AWS Service
- Select only the GetObject action
- Enter the ARN for the S3 bucket we created, in this format: arn:aws:s3:::com.mobiletoolworks.s3tutorial/*
- Click the Add Statement push.
- Afterward you lot click this button, the statement will be added to a table underneath the entry fields
- Verify the argument looks correct, then click the Next Step push button
The side by side page shows you a JSON version of the policy created in the dialog box.
Click the Apply Policy push.

After you Use the Policy, you're returned to the role summary screen. Note the new policy you added for the application is now listed in the Policy list at the bottom of the form.
Create the XCode Project
Now that we have the AWS Backend Service created and configured, permit'southward create our iOS Application and configure information technology to read from the S3 Saucepan.
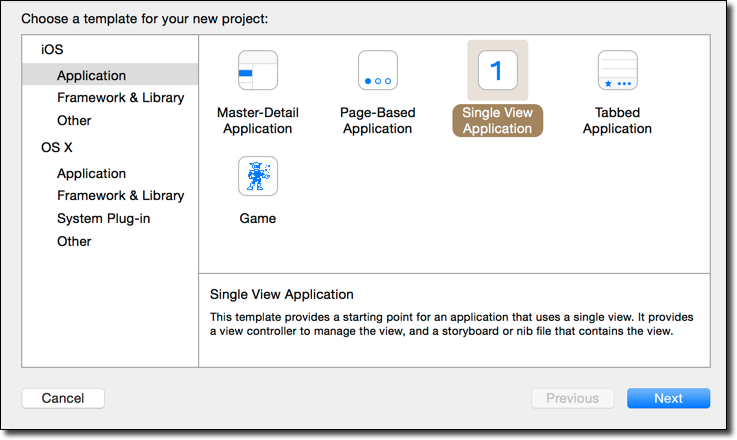
Launch XCode, select File/New Project, select Unmarried View Application, and click the Side by side push.
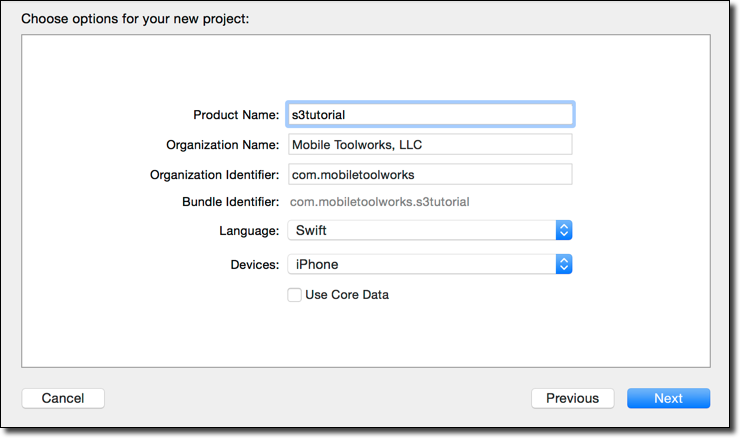
Give your project a proper noun, set the language to Swift, cull iPhone every bit the device, clear the User Core Information checkbox and click the Adjacent button.
Use CocoaPods to add AWS frameworks
Side by side we need to add together the Amazon AWS frameworks to the XCode project. Yous can download frameworks and add them manually if you lot like, but it's much easier to use the CocoaPods dependency manager to practise information technology for yous.
If you don't take CocoaPods configured on your system, follow these instructions to configure your XCode surround to use it.
Create a file named "podfile" in your project root binder, and add the post-obit lines to it:
source 'https://github.com/CocoaPods/Specs.git' pod 'AWSiOSSDKv2' 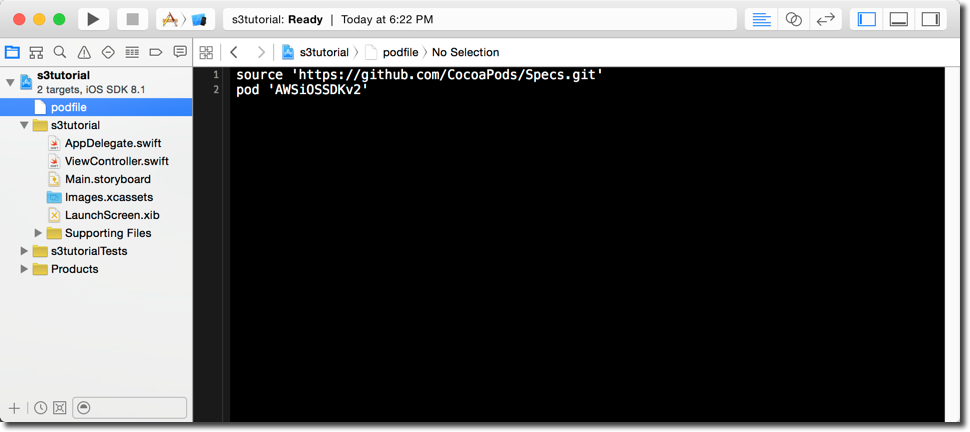
Then close XCode, open up a terminal window, and navigate to the folder where you created your podfile.
From that folder, type the post-obit command to have CocoaPods:
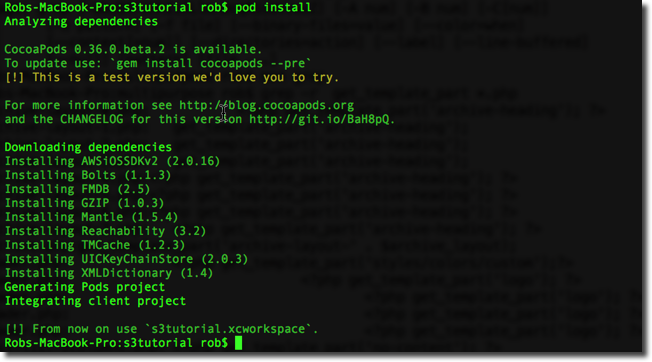
Now await while CocoaPods downloads the AWS SDK (and dependencies), and configures your XCode workspace.
After the workspace is configured, note the instruction on the console that you should now open your projection by double-clicking on the .xcworkspace file rather than the .xcodeproj file every bit y'all did previously.
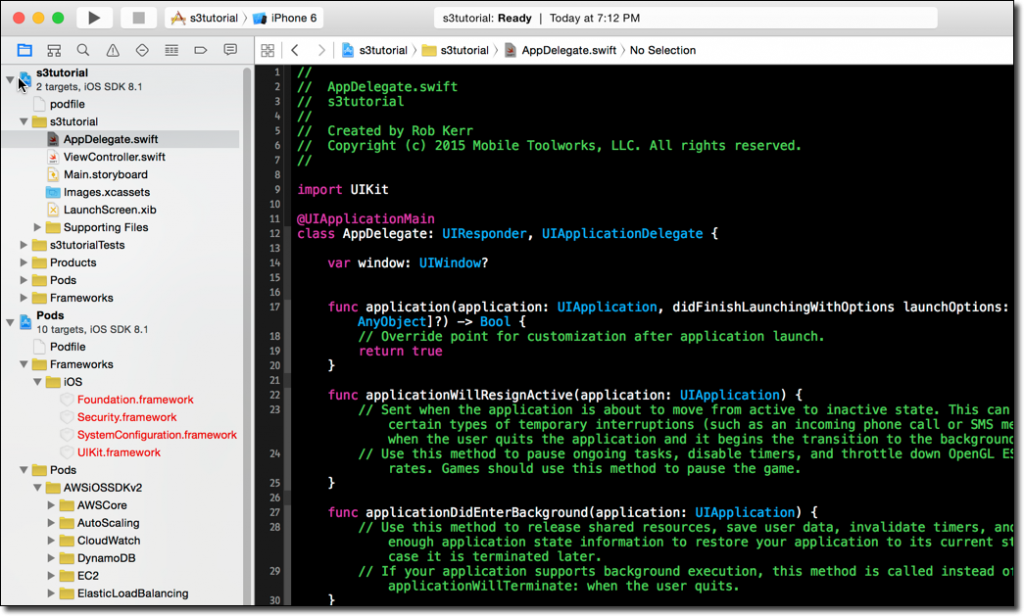
Double-click the .xcworkspace file to re-open the XCode projection. Note how CocoaPods has configured the AWS runtime libraries for you within the XCode workspace.
Since we're using Swift, and the AWS libraries are actually Objective-C, we need to create a bridging header, and configure the project for information technology.
Kickoff, add a bridging header to you lot iPhone app. I've chosen mine "BridgingHeader.h", but you tin use whatsoever proper name you like.
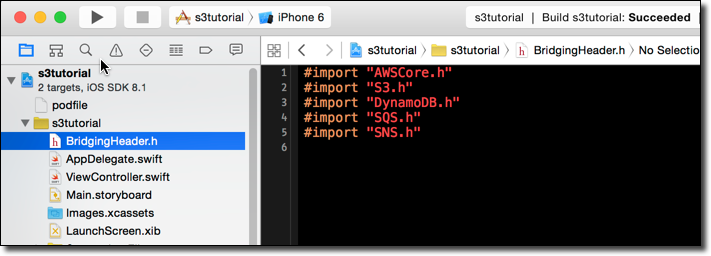
To configure the project to use the Bridging Header, click on your iPhone app target, click on Build Settings, and search for the give-and-take "Bridging". And so change the setting for Objective-C Bridging Header to the name you gave your Bridging Header file.

The projection is now configured for AWS, so next allow's implement some lawmaking to connect to AWS, download and display the file we uploaded at the outset!
Connecting to AWS
Since our objective is to retrieve the image file uploaded to the S3 bucket, the first thing we'll practise is put a UIImageView on the main screen'due south view controller so we tin can display the image once we have it.
Open your Main.storyboard, drag an Image View from the Object Library on to the principal View Controller Scene. And so create an outlet in the ViewController class for the UIImageView. I presume you lot know how to practice this, and then I won't go through all the steps in detail.
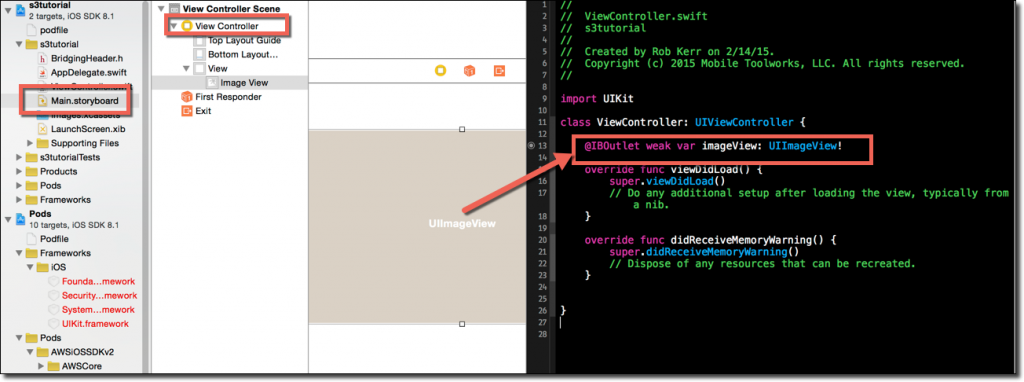
Now that you lot have a UIImageView where the image volition be displayed, replace the viewDidLoad() method with the post-obit. Of form, this is but a tutorial — a product application wouldn't practise all of this in viewDidLoad, just this will at least permit y'all test your AWS connexion and make sure yous've got the hang of configuring your project and tin can use Swift to connect to AWS services.
class ViewController: UIViewController { @IBOutlet weak var imageView: UIImageView! override func viewDidLoad() { super.viewDidLoad() // Hard-coded names for the tutorial bucket and the file uploaded at the commencement allow s3BucketName = "com.mobiletoolworks.s3tutorial" let fileName = "MobileToolworks-Logo.jpg" let downloadFilePath = NSTemporaryDirectory().stringByAppendingPathComponent(fileName) let downloadingFileURL = NSURL.fileURLWithPath(downloadFilePath) // Prepare the logging to verbose so we tin come across in the debug console what is happening AWSLogger.defaultLogger().logLevel = .Verbose // Create a credential provider for AWS requests let credentialsProvider = AWSCognitoCredentialsProvider.credentialsWithRegionType( AWSRegionType.USEast1, accountId: "999999999999", identityPoolId: "us-east-1:ac328da6-63f3-4748-9b8f-25b564422968", unauthRoleArn: "arn:aws:iam::696446148911:function/Cognito_s3tutorialUnauth_DefaultRole", authRoleArn: "arn:aws:iam::696446148911:part/Cognito_s3tutorialAuth_DefaultRole") // Create a service configuration for AWS requests allow defaultServiceConfiguration = AWSServiceConfiguration( region: AWSRegionType.USEast1, credentialsProvider: credentialsProvider) // Create a new download request to S3, and set its properties AWSServiceManager.defaultServiceManager() .setDefaultServiceConfiguration(defaultServiceConfiguration) let downloadRequest = AWSS3TransferManagerDownloadRequest() downloadRequest.saucepan = s3BucketName downloadRequest.central = fileName downloadRequest.downloadingFileURL = downloadingFileURL allow transferManager = AWSS3TransferManager.defaultS3TransferManager() transferManager.download(downloadRequest).continueWithBlock { (task: BFTask!) -> AnyObject! in if task.error != nil { println("Fault downloading") println(task.error.description) } else { // Prepare the UIImageView to show the file that was downloaded permit image = UIImage(contentsOfFile: downloadFilePath) self.imageView.image = paradigm } return nil } // end closure } When you run your program, it will brand an asynchronous connectedness to the AWS S3 service to fetch the file previously uploaded. The file will be downloaded to the iOS temporary folder, and then loaded into the Paradigm View Controller.
There will exist a delay while all this happens, and in a production application you should make sure the user experience is excellent fifty-fifty while waiting for content to load over the network.
Nosotros ready the AWS logging to "verbose", and so you can read through the debug console to meet the diverse things happening under the hood:
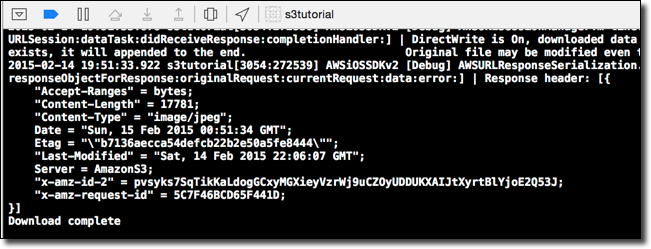
You should meet the bulletin "Download Consummate" that we put into our code, too every bit diverse status and update messages from the AWS SDK every bit information technology makes progress.
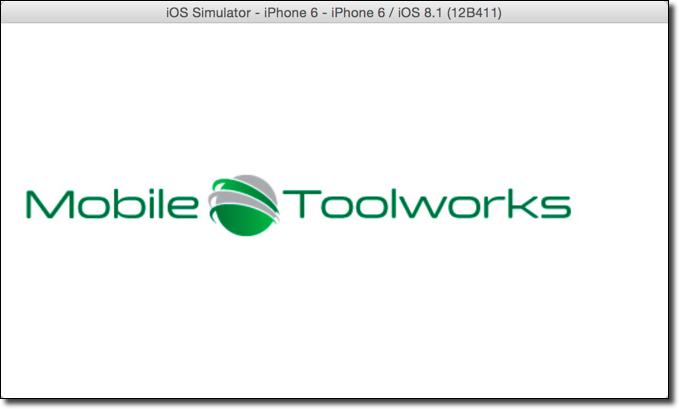
In the iOS simulator, you should finally see the prototype we uploaded to S3, giving a visual confirmation that the entire procedure worked successfully!
Whew! We made it! There were a lot of steps, but now that you've got the hang of configuring AWS and XCode to piece of work together, yous're well on your way to building more apps and using more than AWS services within XCode!
Source: https://medium.com/rekerrsive/tutorial-using-amazon-aws-s3-storage-with-your-ios-swift-app-75b1a4acf134
0 Response to "Upload an Image to S3 Bucket With Swift"
Post a Comment